


Introduction 👋🏻
Hey everyone welcome back to my blog again. This blog is for the beginners out there who are learning Git and GitHub, have you ever faced a problem in cloning or setting up a local project on your computer? Do you get confused by terms forking the project and cloning the project? Do you ever question yourself about what to fork and what to clone? What is npm install? What are dependencies? If yes, you are at the right place.
In this blog, I will teach you about forking, cloning a repository and then setting up that project locally on your computer. This blog will probably be a short one, so just relax and keep reading.
Before you begin I expect you to at least have a gist of what Git and GitHub are and that would be enough. So let's get started.
What is Fork?
You must have seen this button on the top right-hand side of a GitHub repo that says fork.

When you hover over it, it will say that fork your own copy of project_name. What does it mean? When you fork a repository on GitHub then GitHub provides you with a copy of the repository and the URL of your forked project will be https://github.com/your_github_id/CodeBot.git. The name of the organization or the individual who owns the project will be replaced by your name. Now you can make changes and ask the maintainers to review your changes and then finally merge them to the main branch of the project so that your changes are reflected.
What is Clone?
Cloning as the name suggests will clone the forked repository/project to your machine and will generate a folder. You may have a question, why fork then? Why not directly clone the project from the original organization/individual?
So, let me remind you that things don't work that way. You don't have the right to make any changes to someone else's project, GitHub doesn't allow that. Just think of the situation, how it would be if anyone can change anything on someone else's project without their consent!
Therefore, we first fork the project, which means creating a copy of that project for ourselves and then cloning it and making the changes we want. Then we create a pull request so that maintainers can check our changes and if they love it, they would merge your changes and it would then reflect in the actual project.
Setting up a project locally
So as discussed above we will -
First, fork the project. I would be using a project of my own.
Clone the project.
Read the README.md to follow the necessary steps mentioned in the file for the proper functioning of the project.
Forking
With another GitHub account, I will go to the repository of my project and fork it.

You can see in the image above that after you fork a project then the name of the original owner is replaced by your name which implies that now you have a copy of the original repository in your GitHub account. Now you can clone this fork into your machine.
Cloning
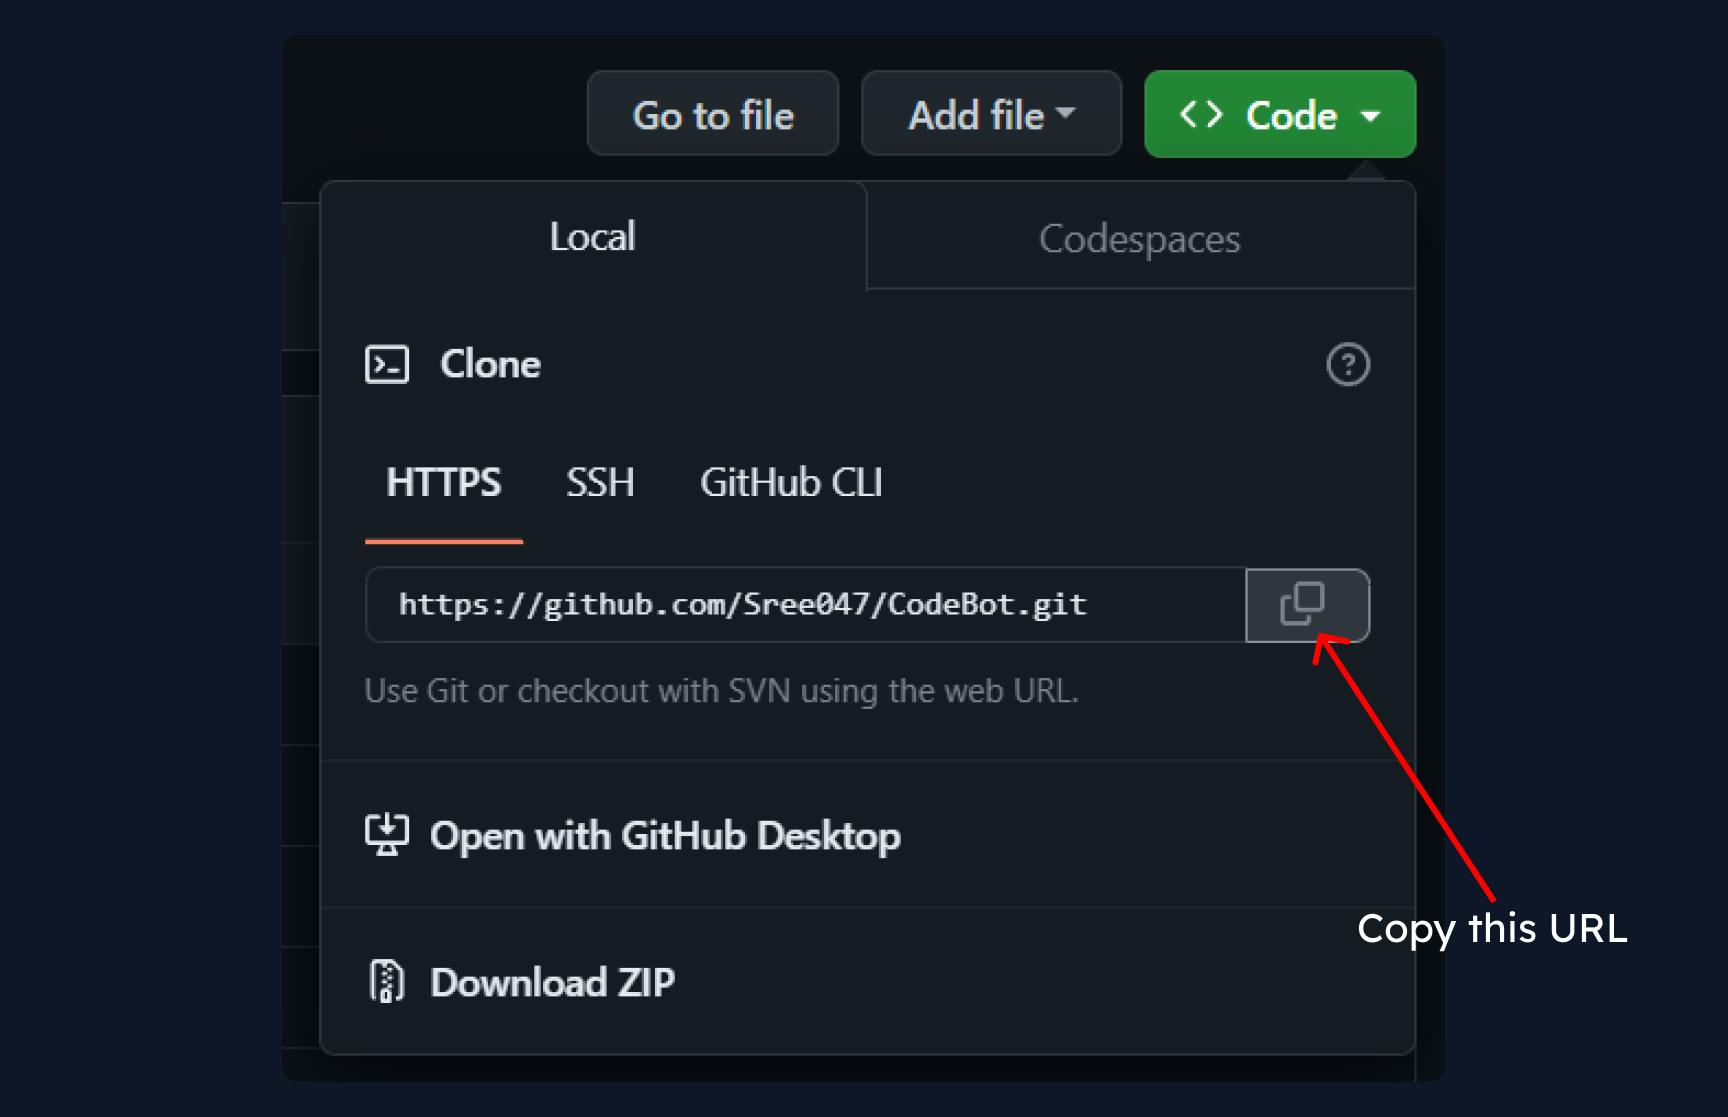
Click on the 'green' colour code button and then copy the URL. After you have copied the link then you have to go to your terminal navigate to the folder of your choice and run the command git clone <YOUR_COPIED_URL>, I am going to clone it on the desktop.
Once the cloning has been done you will get a folder at your desired location.

Now you need to run a command:
git remote add upstream<UPSTREAM_URL>: Upstream means the project that you have forked. This command will connect your repository to the repository of the project that you have forked.
Good going! Now you have the project cloned on your computer. Now we need to go through the README.md file and follow the necessary instructions so that the project works perfectly.
Before that open your project on VS code or on the editor that you use. Now let's see what the README.md file says.

So, the first point says that we should have NodeJS installed in our systems. If you don't have NodeJS installed you can go to this link and download it. We will not cover installing NodeJS in this blog as it is out of the scope of this blog. So you can follow some tutorial on YouTube.
We have already done the next three steps and then it says to do npm install to install all the dependencies. What it means is that we need to install all the tools on which the projects depend and without them, the project won't work. You can find all the dependencies that are required by the project in the package.json file.

Here you can see that the project uses tools like Brace for displaying code, openai library, react etc. Now when you run the command npm install in the terminal it will install all the dependencies. Navigate to your project folder and run the command. You can also use the VS code terminal so that you can directly run the command without navigating.
Then it says that we need to create an env.js file, so create a file named env.js at the same level as that of the src folder.
Then go to OpenAI, create your account and grab the API Key and copy the code from the README.md file and paste your API Key at the required position.
Open up the terminal and run npm run dev, your project is successfully running on localhost.
Wrapping up!
That's it, you have completely set up the project locally and now you can make changes and raise pull requests! Hope this blog was helpful, you can hit the like button and follow me here on Hashnode for more such blogs. You can also follow me on Twitter. I will see you again very very soon till then happy coding!
📢Do you want to learn about Object Oriented Programming? I am writing a series of blogs on OOP with Java you can check it out here!