
Hey, everyone I am back with my another blog, I hope you are doing great! This blog is focused on peeps who have just started with Tech. From the title of the blog, you are already aware of what we are going to do today, but still I will brief you once.
So while going through this blog you will learn :
What is an API and what it does? We will not deep dive into this particular topic but I will give you the necessary information so that you are good to go.
How to use them in our application/website.
You will learn these by building a Random Quote Generator. Woah! you will have a project to show it to your friend after reading this blog. That's great! Is'nt it? So let's begin!
What is an API?👨🏻💻
An API (Application Programming Interface) is a collection of standards, tools, and protocols used to create software programmes. It is a way for different applications to communicate with one another using APIs, which enables developers to incorporate various services and data sources into their applications.
In simpler terms, an API acts as a medium between different applications, allowing them to talk to each other and share information. An API can send functionalities or data from one application to another, enabling developers to use that functionality or data in their applications without having to create it themselves.
There are different types of APIs like Web API, Mobile API, IoT API etc. But when we say API we generally mean Web API and that is what we are going to work with in this blog. Communication between web-based applications is accomplished through the use of Web APIs. They send and receive data via HTTP requests, and they typically give back data in XML or JSON formats. REST (Representational State Transfer) and SOAP (Simple Object Access Protocol) APIs are two additional categories that can be used to further divide up web APIs.
We will not deep dive into what are REST and SOAP but for the sake of it, they are certain rules and regulations that we should keep in mind while designing a Web API.
Let's explore the API we are going to use!🤩
Have you heard of RapidAPI? No? No problem. It is a site that provides numerous APIs for us to use in our application. Let's check out RapidAPI. Just type in RapidAPI in your browser and click the first link and you will see something like this. Sign yourself up and let's move ahead!

After you have signed up paste this link into your browser https://rapidapi.com/martin.svoboda/api/quotes15/ Now you will see something like this

This is a free API so you can freely test the endpoints without subscribing. Now this may seem overwhelming but believe me it's not. You don't need to understand each and everything as of now, once you are comfortable with using APIs then you can deep dive into this and even create an API of your own.
So a few things that you need to understand here are the header parameters. So what are header parameters, they are typically used for authentication and authorization purposes, where they can be used to transmit security tokens like the API key or other credentials that are required for the API to function properly.
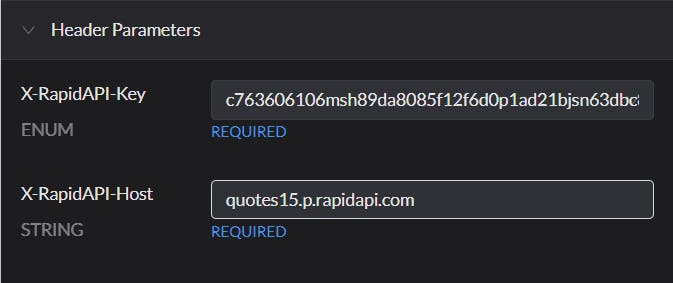
In our case, we have two Header parameters the API key and the Host. The API key is used for authentication purposes and to control who can access the API. API keys are usually a long string of characters and are typically generated by the API provider and issued to developers or users who want to access the API. It is used by the API provider to ensure that APIs are accessed only by authorized users or applications. It is also used to track your API usage therefore you need to know that you should never share your API key with others. The API that we are using here is free so we can push our code to GitHub to show it to the world, but I repeat never push your API keys to GitHub if you are using premium APIs.
The server or service that hosts the API is known as the API host. Receiving API requests from client applications, handling those requests, and providing a response are all the responsibilities of the API Host.
Moving on. Now let's see the code snippet we are going to use. Select JavaScript > fetch from the dropdown. Here is the image for reference.

After you have switched to JS(fetch) click on the 'Test Endpoint' button. You will see a response something like this:-

Let's understand this, so here we are getting JSON as a response to our request. Inside the originator key, we have the name key and its value and the content key-value pair on the outside itself, we will use these two data in our Quote Generator.
This means as it is JSON, we will do something like response.content to get the quote and response.originator.name to get the author's name.
Woo! hoo! that's enough for us to begin creating our Quote Generator. Yes! we are now going to code.
Creating the Quote Generator⚒️
Creating the HTML File
We will be creating three files, namely index.html, index.css and index.js. What we will do is create a simple webpage that will have a button that when clicked will show us a Random Quote and the name of the author. Let's begin with creating the HTML file.
<!DOCTYPE html>
<html lang="en">
<head>
<meta charset="UTF-8">
<meta http-equiv="X-UA-Compatible" content="IE=edge">
<meta name="viewport" content="width=device-width, initial-scale=1.0">
<title>Document</title>
<link rel="stylesheet" href="index.css">
<!-- GOOGLE FONTS -->
<link rel="preconnect" href="https://fonts.googleapis.com">
<link rel="preconnect" href="https://fonts.gstatic.com" crossorigin>
<link href="https://fonts.googleapis.com/css2?family=Pacifico&display=swap" rel="stylesheet">
<link rel="preconnect" href="https://fonts.googleapis.com">
<link rel="preconnect" href="https://fonts.gstatic.com" crossorigin>
<link href="https://fonts.googleapis.com/css2?family=Phudu&display=swap" rel="stylesheet">
</head>
<body>
<div class="container">
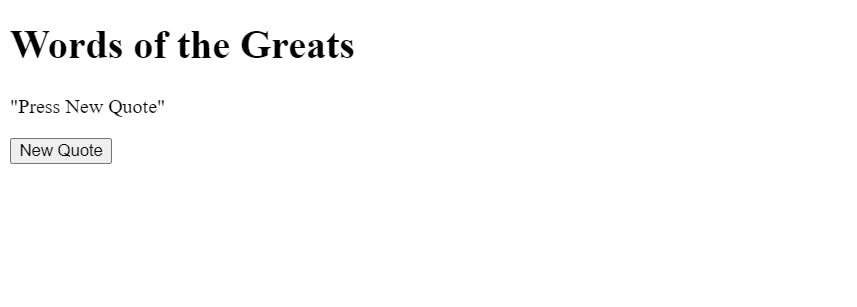
<h1 class="heading">Words of the Greats</h1>
<div class="display--section">
<p class="quote">"Press New Quote"</p>
</div>
<div class="input--section">
<button onclick="get()" class="get--btn">New Quote</button>
</div>
</div>
<script src="index.js"></script>
</body>
</html>
Let me explain to you the structure of the HTML file. First, we have a main div with the class name 'container' inside which we have a 'h1' element for the title of the site, then we have another div with the class name of 'display--section' inside of which we have a 'p' element with the class name 'quote' which we will use to display the Quote that is sent to us by the API. Then we have another div with the class name 'input--section' which contains a button with the 'onclick' attribute with the function name 'get()' On clicking this button we will send a request to the API and in return it will send us the response which we will use to display it in the 'display--section'. At last, we have the script tag included for our JavaScript file to run only after our HTML has been rendered.
Our page as of now will look something like this:-
Creating the CSS File
So let's first style our site, let's first remove all the margin and padding from all the elements and provide some background color to the site.
*{
    margin: 0;
    padding: 0;
    box-sizing: border-box;
}

body{
    background-color: #BBD6B8;
}
After applying the above CSS the page will now look like this:-

Nice we now have some background color on our site, now let's make it better. Let's center all the content on the page, for this, we will use Flexbox. To the 'container' class, we will apply the following CSS.
.container {
    display: flex;
    flex-direction: column;
    justify-content: center;
    align-items: center;
    min-height: 100vh;
}
It's very simple CSS we have used Flexbox to center the contents inside the 'container' div both horizontally and vertically. We also set the min-width to 100vh so that it takes up the entire height of the viewport. The site now looks like this:-

Now let's style the 'display--section' where the Quote from the API will be shown. Here goes the CSS for it:-
.display--section {
    background-color: #AEC2B6;
    min-height: 65vh;
    min-width: 55vw;
    max-width: 85vw;
    margin-bottom: 2rem;
    text-align: center;
    border-radius: 20px;

    display: flex;
    justify-content: center;
    align-items: center;
}
Here we are providing it a background color, a min-height and a width so that it doesn't shrink down and a max width so that it doesn't keep changing its width with different Quotes. Then providing it some margin-bottom, and setting it's text-align to center and giving it some border-radius.
We are using Flexbox here to center the 'p' element which is inside this div(check out the HTML file).
The site now will look like this:-

Now style the title or heading of the site.
.heading {
    margin-bottom: 20px;
    font-family: 'Phudu';
    color: crimson;
    border-bottom: 2px solid;
}
It's simple CSS nothing to explain here. You can find the fonts inside the head tag of the HTML file itself.
The site will look something like this now:-

Wow! it's already looking pretty good to me. Let's finish the styling ASAP.
Now we will style the quote and the author name that we will be getting from the API, as there is no data with us now therefore you will not be able to see the styling effect of the author class. Here is the CSS:-
.quote {
    padding: 20px;
    font-family: 'Pacifico', cursive;
    font-size: 1.5rem;
}

.author {
    text-align: right;
    margin-right: 20px;
    color: darkgoldenrod;
}
The site will now look like this:-

Now we have only buttons left to style let's do this and then we'll move to JavaScript where we will implement the API and get the data from it and show it on the screen! Let's hurry!
Here is the CSS for the button:
.get--btn {
    height: 40px;
    width: 140px;
    border: none;
    background-color: #DBE4C6;
    border-radius: 10px;
    font-family: 'Phudu', cursive;
    transition: all;
    transition-duration: 0.5s;
}

.get--btn:hover {
    cursor: pointer;
    background-color: #94AF9F;
    color: white;
    scale: 1.1;
}
Here we have applied some height and width for the button and set its border to none. We have also applied a small transition effect, when the button is hovered upon its background color and the text color is changed along with a beautiful pop-up effect which is created using the scale property, which is set to 1.1
Here is how it looks now:-

Nice, looks good to me! Add this media query so that it looks good on mobile devices too and now let's use the API 🥳
@media screen and (max-width: 480px){
    .display--section {
        min-height: 60vh;
        min-width: 80vw;
    }

    .container {
        min-height: 0;
        padding-top: 20px;
    }
}
The complete CSS file looks like this:-
*{
    margin: 0;
    padding: 0;
    box-sizing: border-box;
}

body{
    background-color: #BBD6B8;
}

.container {
    display: flex;
    flex-direction: column;
    justify-content: center;
    align-items: center;
    min-height: 100vh;
}

.display--section {
    background-color: #AEC2B6;
    min-height: 65vh;
    min-width: 55vw;
    max-width: 85vw;
    margin-bottom: 2rem;
    text-align: center;
    border-radius: 20px;

    display: flex;
    justify-content: center;
    align-items: center;
}

.heading {
    margin-bottom: 20px;
    font-family: 'Phudu';
    color: crimson;
    border-bottom: 2px solid;
}

.quote {
    padding: 20px;
    font-family: 'Pacifico', cursive;
    font-size: 1.5rem;
}

.author {
    text-align: right;
    margin-right: 20px;
    color: darkgoldenrod;
}

.get--btn {
    height: 40px;
    width: 140px;
    border: none;
    background-color: #DBE4C6;
    border-radius: 10px;
    font-family: 'Phudu', cursive;
    transition: all;
    transition-duration: 0.5s;
}

.get--btn:hover {
    cursor: pointer;
    background-color: #94AF9F;
    color: white;
    scale: 1.1;
}

@media screen and (max-width: 480px){
    .display--section {
        min-height: 60vh;
        min-width: 80vw;
    }

    .container {
        min-height: 0;
        padding-top: 20px;
    }
}
Creating the JavaScript file (using the API)
function get() {
    const options = {
        method: 'GET',
        headers: {
            'X-RapidAPI-Key': 'a3a86dd44amshcb89a9c08dd8046p1ec6ebjsnfcebd44aa25a',
            'X-RapidAPI-Host': 'quotes15.p.rapidapi.com'
        }
    };

    fetch('https://quotes15.p.rapidapi.com/quotes/random/', options)
        .then(response => response.json())
        .then(response => document.querySelector(".quote").innerHTML = `"${response.content}" <p class="author">~${response.originator.name}</p>`)
        .catch(err => console.error(err));
}
The JS file is the simplest of them all. We are creating a function named 'get()' which we have already assigned to the 'onclick' attribute in the HTML file.
Inside the function, we will paste the code provided by the RapidAPI, yes that JavaScript fetch method code. This one.

Now what we will do is grab the 'p' element inside the div with the class name 'display--section' by its class name 'quote' using querySelector.
.then(response => document.querySelector(".quote").innerHTML = `"${response.content}" <p class="author">~${response.originator.name}</p>`)
The entire functionality of the website lies in these two lines. Let me explain it to you briefly.
So what we are doing here is, first we grab the 'p' element with the class name quote using the querySelector method. Now what we will do is manipulate the inner HTML or the contents inside the 'p' to display the data returned by the API.
We are using backticks in the second line to provide the contents because we have to deal with JavaScript to display the data.
First, we display the Quote that is returned by the API by grabbing the key-value pair for it. Here is the format of the data that is returned by the API.
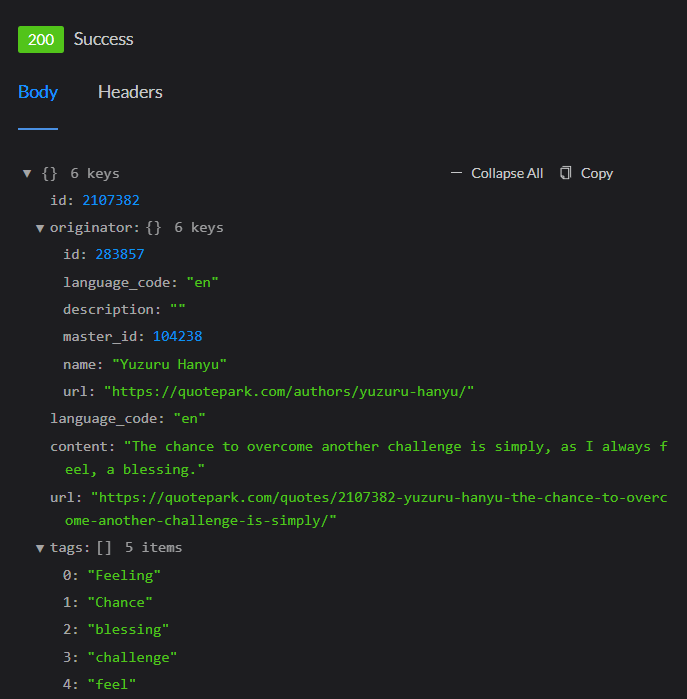
As the content (quote) is at the top level we can grab it by simply writing response.content Since this is JavaScript we write it inside '${}'.
Similarly, we will display the name of the author inside a new 'p' element and give it the class 'author' so that it picks up the style from the stylesheet. Since it is one level inside the response i.e. originator object we have to do response.originator.author to grab the name of the author.
Woo! Hoo! That's it. Yes! you have successfully created your first website using an API. Our Random Quote Generator site is done and now it looks like this👇🏻

Great! Now you can push it to your Github and deploy it through Netlify to show it to your friends.
Bye Bye👋🏻
There are numerous fun APIs on RapidAPI check them out and try to build something cool and interesting. Before I take your leave, if you read and loved the blog make sure to like it and follow me for more such blogs. You can also follow me on Twitter and GitHub with that said I will meet you in my next blog until then Happy Coding!